Showing posts with label Getting Crafty. Show all posts

Friday, April 26, 2013

Dollhouse Days, Revisited, and Fancy Rewards!


Six years ago, when Gracie was a diaper-wearing toddler, I blogged about her love for Playmobil and the pop-up dollhouse I saved from my own childhood Playmobil-playing days. {clicky click}

Well, naturally my children destroyed the dollhouse (I blame baby Annelie) and lost all the people (I blame Gracie) and now they look at the pictures and regret being the Queens of Destruction very deeply.

GRACIE [gazing wistfully at the picture of toddler-self playing with rad dollhouse]: Ugh, that looks awesome.

ME [remembering playing with said dollhouse when I was her age]: It was. It really, really was.

Gracie, upon discovering that Playmobil has a super fancy royal set of dolls, has rekindled her love for her "people" - what she called her favorite toys when she was two and a half.


It's like they were designed just for her. And as a Playmobil-loving parent, I couldn't be more jazzed.

But..... I refused to buy them for her. Yep. 

ME [2 months ago]: Guess what, kids! I've come up with a new Hopkins Family System of Doing Things, and from now on, when you beg and beg and beg for more toys, I'll say, Sure you can have toys! But first you have to earn the tickets to buy them! [waves handful of freshly printed tickets from http://www.kidpointz.com/]

GRACIE: No way. I'm just going to use the money in my piggy bank. 

ME: Nope. After I caught Annelie with TWENTY DOLLARS in her backpack, so she could buy her friend's hand-drawn comics, Daddy and I have decided you girls are going to the bank and starting accounts, and you don't get to spend your money. 

[shakes handful of tickets] But good news! You get to earn tickets to buy whatever you want!

At first my kids were a little shell-shocked, because my new Family System of Doing Things involves hard work and math skills, and a zero-tolerance-for-sibling-rivalry policy. (they get to earn behavior tickets - yay! - but have to give them up to their sister when caught being rotten little meanies - boo!)

Fast forward two months, and now they have ticket jars full of awesome behavior tickets, and charts full of neon happy face stickers, for doing daily chores, and momwork (math tutoring w/ me - yay, fun!). And their chart stickers turn into tickets that can't be taken away, or given to their sister, once their chart is full. They're pretty excited about their tickets.

And I can never quite believe how much smoother life gets with an in-house reward system. My kids eat it up! They ask for extra chores and beg to study! WHO ARE THESE PEOPLE?

Anyway, Gracie has been saving and saving, and finally last week, after passing over 75 tickets and a printed voucher for the Playmobil Royal Dressing Room set, she bought herself her first toy - and proceeded to stalk the mail, counting down the 5 shipping days until her new playset was hers, all hers!

You guys, it was the cutest thing! I've never seen her so excited for something. 

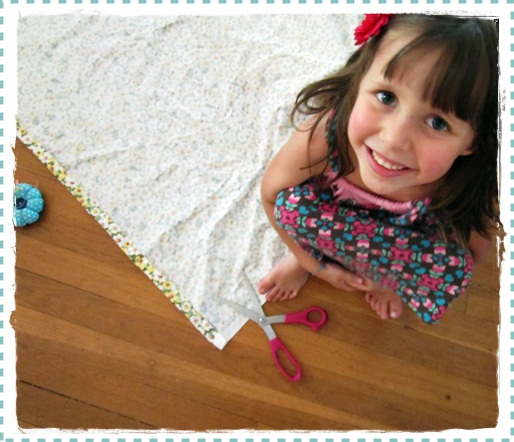
And because I had an empty box laying around, and a room full of craft supplies, gold puffy paint, and a glue gun, *kisses glue gun* I said, "Hey, let's build your Playmobil a fancy dressing room."

So we did!

Her dolls came in the mail a couple days ago, and she hasn't stopped playing with them - and her new dressing room - since. 

And, because this is Gracie we're talking about, here... yes, I have already taken away behavior tickets for catching her out of bed, playing with them late at night on a school night - the little sneak.

She was super excited to comb though my Southern Living magazines for room decorations - especially when she found Monet's Waterlilies (her favorite).

Isn't her little dressing room cute? She used the Napoleon Apartments at the Louvre as her inspiration, and made sure it had the chandelier of her dreams.


And dogs wearing fancy necklaces.

Also, after taking some photos of her playing with her new dollhouse... I realized I never wallpapered the outside of the box.... 
 ME [to Gracie]: Don't worry, I'll paper the outside for you ASAP.

WILL: Why would you cover up the best part?

GRACIE [rolls eyes]: Da-ad!

So that's what we've been up to, lately! Also, someday I'll blog about my husband winning us a spring break trip to Jamaica, and then winning another trip to Jamaica while we were in Jamaica. Yes, he is that amazing.

Happy Friday, folks! Hope you have a great weekend! 

xoxo,

Friday, January 25, 2013

A Freebie for Friday

Remember the mermaid illustration from yesterday's blog post? Well, I said I painted her for a purpose, and that purpose happens to be the birthday invitations of a certain soon-to-be-6-year-old in our household.

SIX YEARS OLD!!

Man, I am never going to get used to my kids getting older each year.

Anyway, last week Annelie decided she wanted a mermaid-themed birthday party... then she told me who she was inviting from her class, and her list was mostly boys.

"Why don't you have your party be a mermaid AND pirate party?" I suggested. She was all for it, and instantly crossed another girl off her invite list in favor of a boy who "just loves pirates so much." 

Well, I just love pirates so much, too, and mermaids. And since I couldn't find any pirate/mermaid invitations I liked, I whipped out the watercolors and made one that I thought would be especially fun with singed edges (I love singeing edges).

So, since it's Friday, and Fridays are some of the best days of the year, here is a little freebie for the pirate and mermaid lovers out there who might want invitations to print from home. Or for the journalers out there, or the peeps who might want some print-it-yerself stationary.
And if you'd rather print yourself a finished invitation and fill the blanks in by hand, here you go:
And I'm sure you already know this, but for those who don't: These images belong to me, and are for personal use only! You are welcome to print, use, and share with friends, however, please DO NOT print with the intent to sell, or alter and claim as your own. Thank you!

Have a great weekend, folks!

xoxo,

Saturday, October 27, 2012

Perfectly Pippi


You better believe I had heart palpitations of joy when Annelie informed me that she wanted to be Pippi Longstocking for Halloween.

We made a Mr. Nilsson monkey pal together (blogged here) and got crafty with her dress.

I decided, out of sheer laziness, that this year I would not touch my sewing machine once. Oiling my machine and winding bobbins of matching thread is not high on my list of Favorite Things To Do, so I wimped out and grabbed my most favorite crafting tool ever.

Yep, that's right, this year's costume is compliments of my glue gun. Add in my fabric scrap stash, a bottle of Neon Red hair spray, and approximately 1 hour (including dress-gluing), and I managed to transform Annelie from a girl who acts just like Pippi, to a girl who looks just like Pippi.

Then off to the school Fall carnival we went.

Pippi pet the chickens.
Pippi fed the cows.

But the highlight, for me, was when Pippi and Mr. Nilsson found their buddy Little Old Man, and galloped off into the sunset.

(or, you know, walked around the school sports field)


And the wacky bookish trio was complete!

Annelie was a hit, but mostly by the parents, who remembered Pippi's adventures from their youth but had yet to share her with their kids. "How does she even know who Pippi Longstocking is?" I was asked by multiple people.

After chatting with them about reading Pippi to the girls before our trip to Sweden this past summer, I do believe there will be a few fellow school chums welcoming the wacky redhead into their lives. (hurrah!)

Gracie had an awesome time at the carnival, too, decked out as Captain Happypants, my favorite super hero. 

I can't wait to see what costumes these kids come up with next year!

Hope you have a happy and safe Halloween this year, folks!

xoxo,

Tuesday, October 23, 2012

Captain Happypants


When it came to this year's Halloween costume idea, I expected the usual from my fairly predictable mermaid princess fairy fashion designer seven-year-old. 

Multiple shades of pink - check!
Glitterized accessories - check!
Hearts, hearts, and more hearts - check!
Superhero mask and cape - .... wait, what? 

"I'm going to be a super hero for Halloween!" Gracie announced last week, and I'm not gonna lie - I was a bit on the stunned side. She's never been much of a super hero fan before (except Spiderman, when she was 4).

"And I'm going to wear my polka dot underwear on the outside of my pants," she went on to say.

Ah, now that makes sense.

Gracie is all about the hilarious. She's a bit of a class clown, and her new favorite thing just happens to be graphic novels - graphic novels such as Babymouse, Queen of the World, and THE ADVENTURES OF CAPTAIN UNDERPANTS.
But Gracie didn't want to be any old has-been-done-before super hero. Nope, this girl wanted her own identity.She's filled her notebook up with all sorts of girly superheros, like Super Ballerina and Lady Captain Stretch.

And for herself? She's none other than... CAPTAIN HAPPYPANTS!
We found the mask template at firstpalette.com, and cut it out of glittery pink felt. The cape she made out of a minky dot baby blanket. The rest is a combo of pajamas, her favorite pants, and her polka dot undies.

I'm not sure what Captain Happypants' super power is, other than the ability to crack me UP. But whatever it is, it's working for her.
Also, I think I need to have a little The Dreamy Giraffe art print shopping spree. Gracie is a big fan of Kathy Jefford's big eyed girls... and hasn't even seen this girly superhero yet! 

I think we need a new addition to her already pink bedroom.

by Kathy Jeffords

Hope you're having a great week so far, folks!

xoxo,

Friday, October 19, 2012

Making Mr. Nilsson

Annelie acts a lot like the hilarious and rebellious red-pigtailed Swede, Miss Pippilotta Delicatessa Windowshade Mackrelmint Ephraim's Daughter Longstocking.

She loved when we read the book together last spring, so it's no surprise that she wanted to make herself a shoulder-sitting Mr. Nilsson to go with the Pippi costume she can't wait to wear for Halloween this year.

Also, I introduced her to my little friend....
Giving my kids glue gun privileges just might be the biggest mistake I've ever made - potentially worse than scissor privileges, which led to years of crazy-cut hair. I've already peeled quite a bit of melted glue off my floors. But I'm a glutton for punishment, raising two craft junkies. Some things can't be helped.

Annelie raided my felt and fleece stash, and I helped her cut out a monkey shape to glue and stuff.
I cut out the nose and eyes to her specifications, and helped a bit with the face-gluing... but she did the rest!

I think they make the perfect duo. They even look alike.


Happy Friday, folks! Hope you have a great weekend!

xoxo,

Wednesday, May 16, 2012

Winter Shirt to Super Cute Sundress Refashion

Summer is, in my opinion, a time for sundresses, because sundresses are like nightgowns, and nightgowns are pajamas. I AM A FAN OF PAJAMAS. My girls agree that summer is a time for dresses, but they're more into the whole princesses-wear-dresses thing, which is where they base their reasoning.

Well, as the girls and I are leaving the country, and more interested in spending our summer spending cash overseas, I decided it was time I pulled out those too-small winter shirts I've been storing - the ones my kids loved too much to part with once they outgrew them - to sew the girls some sundresses out of 'em.

Pillowcase dresses from t-shirts are the easiest dresses to make, I'm certain. I have a couple variations below, and they each took an hour or less to make.

To start, you need a few things -
  • A shirt to cut up - a bit smaller than your kiddo currently wears is just great - I was using size 4T long sleeved shirts, to make size 6-7 girls dresses.
  • Basic sewing/pinning skills - if you can pin fabric together and sew a moderately straight line, this tutorial is for you.
  • fabric for the skirt, optional waist sash, and neck tie - I just pulled a handful of fabric off my shelf, but I don't think I used more than a half yard of fabric total for each dress (my fabric was aprox. 40in wide, and long enough to reach the knee)
  • Colorful bias tape - only half a package for the single layer dress, and 1.5 packs for the two tier w/sash dress)
  • Coordinating thread and a pair of scissors
To Make (and pardon the fact that my photos show me making many dresses at once - hope this isn't confusing):

Step One - cut your shirts! Just cut the sleeves off, and cut a straight line across the front and the back...


Fold over and pin the top (aprox 1/2 in.). Sew the straight line so that there is a little pocket to thread the shoulder strap. 

Step Two - make the thinish shoulder strap

Or better yet - have the kiddos make the shoulder strap!  

Now, I'm not one of those people who measures, or follows a pattern, and if you are... well, this might not be the tute for you. But if you are of the cuts-fabric-willy-nilly persuasion, like me, you're in for a treat, because making a strap is easy. You just cut your fabric into a straightish strip, fold it in half, sew to close it up - the unfinished edge will fray a bit. Or you can do it the hard way and make the inside-out tube, and then spend a million years right-side-inning it (no, that's not the technical term)

I gave my 5-year-old strap-cutting duty. She did a decent, if not slightly wonky, job.

Step Three - Make the skirt

Start by cutting off the bottom edge of the shirt. 

Sew your skirt fabric into a loop, and then top stitch so it's nicer-looking. If you're doing a two-tiered skirt (example picture below) do this for both tiers. 
 

Pin your skirt to the shirt! Just make sure that when you pin it, the correct sides are together, so that when you sew it, you don't have a big old backwards facing mess (yes, I have done this before). Also, pin it in evenly spaced intervals. I start with one pin at the front, back, and each side, to make sure it's all even, then pin each section, making sure to give an even distribution of gathered fabric.

If you are making the two-tiered skirt, just sandwich both tiers together. It isn't any harder than one tier, I swear.
Then you sew, like so. 

And flip right-side out.

Ta da! You're almost done!

Just weave the strip of fabric you made for the shoulder strap through the front, then around the back, so they tie at the shoulder. We tie ours with a bow in the front, so it doesn't tickle the shoulders as the kiddos play.

And if you want to add a color punch, sew colorful bias tape (mine is the color of the shirt) to the bottom, to finish the edge. 

Step Four - the sash! 

I made the sash the same length as every thing else (aprox 40 inches long) 

I like the sash because it gives the skirt a tailored look. For the two-tiered skirt's sash, I sewed some bias tape around the bottom edge before tacking it to the dress, just because I wanted to break up the busy pattern.

Just try the dress on your kiddo, and tack the sash in a couple spots - the front and sides are good. Then do a few stitches to hold it in place.


And that's all! 

Well, unless you're of the makes-matching-hair-accessories variety - which I am. The buttons and crochet flowers I bought on Etsy (just search hair bow supplies), and glued onto alligator clips.


Annelie is quite a fan of her new summer sundresses, especially the Rapunzel dress. 

But you want to know which dress is her very favorite to play in, because it's soft and comfy and made of her most favorite things?


A cute combo, now size 6/7, from her favorite empire-waist dress when she was 3 (and still cutting her own hair), and her favorite LOVE shirt from when she was 4 (and a princess butterfly)... 

 (she made the shoulder strap using the sleeves of her dress)

Ta-da!
My sources say she will be living in these sundresses all summer long, she loves them so much. Gracie's are all in various stages of unfinished, and my sources say she'll be living in hers, too.

So what do you think? Want to make some simple sundresses, too? Have questions? Feel free to ask in the comments!

xoxo,


Related Posts Plugin for WordPress, Blogger...